Feeds:
Posts
Comments

Archive for February, 2011

Oops -- Yours Truly winces as a gob of PROSOCO R-GUARD Joint & Seam Filler obeys gravity. I managed to get most of the fiber-reinforced fill coat and seam treatment where it was supposed to go, however.

I probably didn’t need to be nervous, but I was.

I had about an hour to use our PROSOCO R-GUARD Joint & Seam Filler, and R-GUARD FastFlash to completely seal a casement-window rough opening before the window installers got back to put in the new window.

The rough opening -- "Seal me!"

The only problem was that I’d never used those products. Old dog, new trick, as the saying goes.

I knew this moment was coming, and not being a “handy” guy, I dreaded it — since December. That’s when, while cleaning the casement window, Karen discovered that the opening/closing mechanism was shot.

It was missing several pieces, in addition to having some corrosion.

While investigating that, I found that the wood frame was rotten from water infiltration in places. Time for a new window.

So I wrapped the uncloseable thing with plastic and duct tape.

A thousand dollars and several months later — yesterday, in fact — we finally had the new window, window installers, and the warm day suitable for window installation. I was ready with PROSOCO FastFlash products, caulk guns and knives, and product data sheets.

Also present — Stephen Falls, PROSOCO’s graphic artist and photographer; and John Young, our multimedia specialist, both there to get some stills and video of Joint & Seam Filler, FastFlash and yours truly in action.

The only problem was — while I’ve written extensively about how easy these products are to use, I’d never used them. And frankly, I didn’t want to! These things are best left to professionals imho.

In fact — and I hate to admit this — I was ready to let the window be installed using the adhesive tape that the installers normally use to flash the rough opening just because I didn’t feel confident in my abilities to become part of the installation crew.

But when I told my boss, Director of Marketing Scott Buscher, about the window situation, he was indignant.

“How can you write about these adhesive tapes and fabrics that fail and let water in, and then go and use them yourself?” he asked me. “How can you look at all the photos we have of window failures from these traditional practices and not want to do it right? How can you look at your own damaged window and be willing to let it happen all over again?”

Easy, I don’t want to look like an idiot in front of the construction guys. But I didn’t say that. I reluctantly decided I’d do it — how hard could it be? It definitely seemed like it would be harder if I didn’t.

My deal with the installers — general contractor Gary Bruhns and P.J. Hall of Prairie Wind Homes, Lawrence — was that they’d take out the old window and prepare the rough opening. It just needed to be clean and solid wood. Didn’t even have to be dry, since Joint & Seam Filler and Fast Flash work fine on damp surfaces.

General contractor Gary Bruhns, Prairie Wind Homes, works at getting the old window frame out so I can flash the rough opening.

While the crew went to buy new trim for inside and out, I’d flash the opening while being video-ed and shot by John and Stephen. I was especially glad Stephen was there. He’d used the products before on a small project at his own house. He offered some good advice, and even took a turn with the application.

I also got some good advice from Paul Grahovac, the day before. Paul is the R-GUARD product-line manager. He has hands-on experience, too.

So going in I knew a couple of useful things:

The Joint & Seam Filler doesn’t have to be completely dry before applying the FastFlash on top of it. It just needs to “skin” a little. Same thing for the FastFlash — just needs to skin a little before the window gets popped in.

Also, if they mix together a little before fully drying, no big deal, since they are completely compatible.

What I didn’t know: Even with these fast-drying products, would I have enough time before the installers got back? I needed time to fill all joints and seams in the rough opening, then let the application dry at least a little. Then I had to cover the whole thing with FastFlash, and let it dry a little.

Every seam and opening had to be filled with Joint & Seam Filler, then covered with waterproof FastFlash.

The thing I was most scared of was to be on the ladder futzing around with the stuff while the window guys impatiently twiddled their thumbs waiting for me.

As soon as Gary informed me the opening was ready, I got to work. First, I caulked the joints, nail-holes and any other opening I could find with the pink Joint & Seam Filler. I just ran a bead along the seams and used a plastic spreader to jam it in.

I needed to fill the seam between the wood frame and the inside drywall, and the seam between the frame and the outside sheathing. Also, the joint between the vertical member and the horizontal.

It was easy on the bottom horizontal part of the window. It got a bit drippy as I applied to the top. I found if I kept the nozzle pressed at an angle against the wood, I got better adhesion.

A bead of Joint & Seam Filler goes along the seam between the drywall and the wood.

Use plenty, Stephen advised, and I did.

I smeared the Joint & Seam Filler in with the spreader as I had on the bottom. Where the spreader was too big, I used a small caulking knife.

The side pieces were easier than the top, but still had some drip issues. I struggled to try to catch drips.

“You should see Shawn Derosier (a contractor we know) put this stuff on,” Stephen said helpfully. “He does it really neatly and it takes him about a second.”

Finally, I was done. The guys were still gone. We took a break to let the Joint & Seam Filler “skin.” I’d forgotten to check my watch when I started, so I didn’t know exactly how much time I used. I was antsy and continually fingered the treated wood to see if the Joint & Seam Filler had skinned.

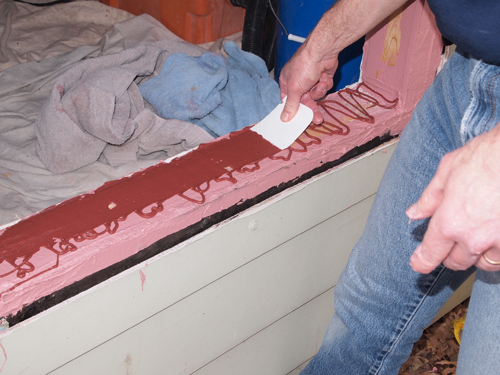
Finally, it seemed just dry enough. I applied the dark red FastFlash in a looping back-and-forth pattern, at Stephen’s suggestion. Then I ran the spreader over it in one smooth motion, which is how Stephen advised me that Shawn Derosier does it.

Yours truly applies FastFlash in a looping pattern over the Joint & Seam Filler. . .

... then spreads.

Seemed to work pretty good, though, at least on the bottom horizontal piece. Again, it was a little harder doing it upside down on the top piece of the opening. I couldn’t keep the nozzle tight against the surface either, for fear of gashing the just lightly dried Joint & Seam Filler.

Plus, my hands, more accustomed to typing than construction, were getting tired from squeezing the trigger on the caulk gun, even though I switched frequently.

I manned up, though, and got top and sides completely coated before Gary and crew returned — but only just. The FastFlash still needed a few minutes to skin, but luckily, the guys had to take some time to cut the interior trim and exterior framing they’d bought.

That included setting up a gasoline-powered generator for electricitiy, since our local utility company had chosen that day to cut the neighborhood power while they changed out a transformer.

I’m not exactly sure what Gary and crew thought as they gazed at the rough opening now thoroughly coated with the red, rubbery, waterproof FastFlash. They seemed to take it in stride, however, and proceeded with the installation.

I suddenly realized my part was done, and felt vastly relieved. Stephen and John packed up their gear and headed out. I commenced clean-up.

Almost before I knew it, the new window was in and the trim painted. In place of a broken, plastic-sheathed eyesore, we had a brand-new Energy Star-rated window. And thanks to the waterproof, yet vapor-permeable R-GUARD products on the rough opening, I won’t have to worry about replacement due to water-infiltration issues.

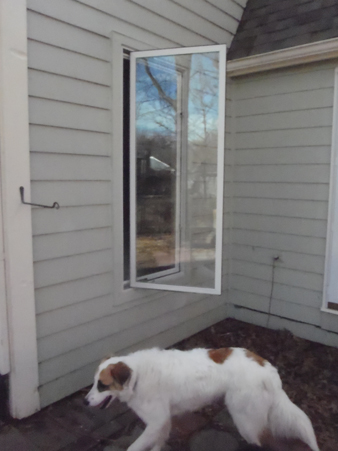
A pretty day reflects in the new window, with one of my dogs, Lambchop, thrown in for perspective.

Karen arrived home from work, and was very pleased with the new window (better be, she picked it out). As a bonus, from my point of view, on his way out, Gary asked me about pricing for the FastFlash products.

He said it might be worthwhile to offer them as an upsell option on window installations.

I guess all my talk about how these products were designed by window replacement contractors who didn’t want to replace windows with the same products that failed to begin with paid off a little.

And Gary certainly saw how FastFlash and Joint & Seam Filler are designed for the real world in their ability to dry fast enough to not hold up production (hence the name “Fast”Flash).

So it’s all good, but the thing I’m most grateful for is that I didn’t fall off the ladder… at least while anyone was looking.

# # #
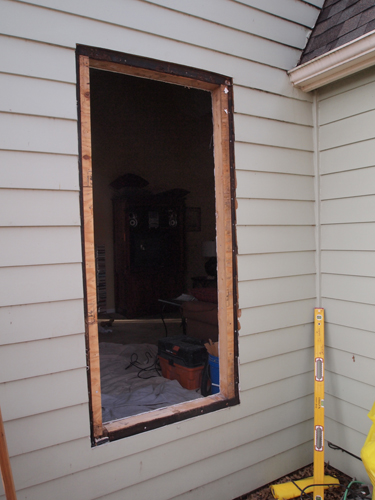
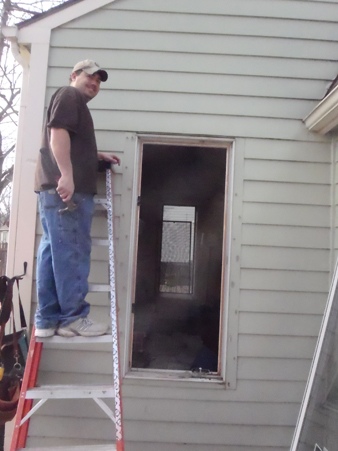
Crewmember Lance Bruhns prepares to take a hammer to my house.

Read Full Post »

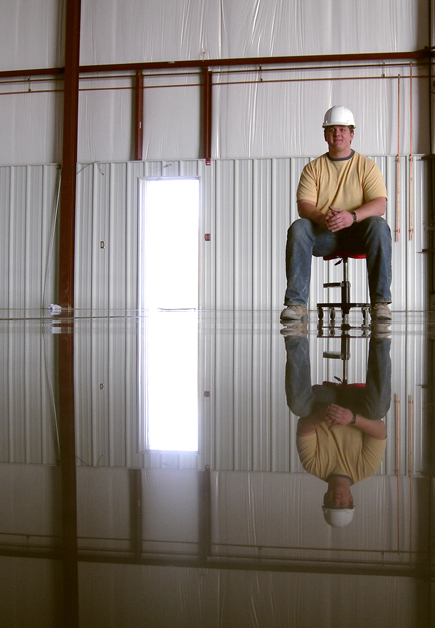
Ryan Klacking, president, Syncon Inc., Dearborn, Mich., takes a minute to smile for the camera, along with his reflection in the polished concrete floor he created. photo courtesy Syncon

Polished concrete floors burst onto the construction scene a few years ago, and have gained in popularity ever since. They are one of the few areas in construction that continue to grow despite the down economy.

One reason is that because you don’t have to strip or replace them, polished concrete floors can save a lot of money over time for schools, hospitals, stores, and any place where you keep an eye on the maintenance budget.

Another reason is that they can be drop-dead gorgeous.

Aesthetics is one reason for the popularity of polished concrete floors. This beauty was created in 2007 for Blackhawk Church in Madsion, Wis. Erik Hendrickson photo

Here’s a quick look at the basics of creating these remarkable floors.

Grinding/polishing procedures depend on individual floors and conditions. In general though, it’s like sanding wood.

Grinding
Grinding starts with coarse diamond pads to grind the floor and proceeds to ever finer grits until you get the polish level you want.

At some point, usually around 200 grit, you switch from “metal” bond diamond-impregnated pads to “resin” bond diamond impregnated pads. The difference is that the metal bond holds the diamonds more firmly on the pad, which gives a more aggressive cut, for grinding and removing more floor material.

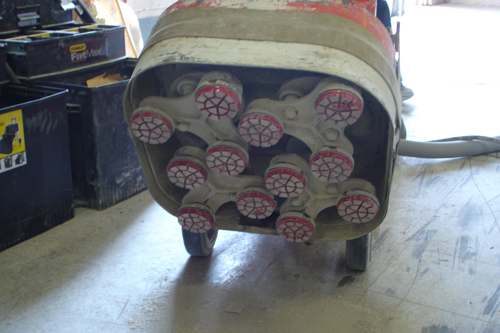
This photo shows coarse-grit metal-bond diamond grinding pads on a "planetary grinder. It's called a "planetary" grinder because the tri-armed "heads" the pads attach to whirl around in a circular "orbit."

The resins hold the diamonds less firmly and are less aggressive. Combined with finer grits, they remove less material and provide a shine.

Grinding usually starts with metal-bond diamonds as coarse as 30- or 50-grit. You work up to about 200-grit, then switch to resins. Your first cuts with coarse resin-bond diamonds of 100- and 200-grit are the last steps in grinding. Polishing is usually considered to begin with 400-grit resins.

If you’re going to color the floor with a water-based or acetone stain, this is a good point in the procedure for the first coat – after the grinding but before the polishing.

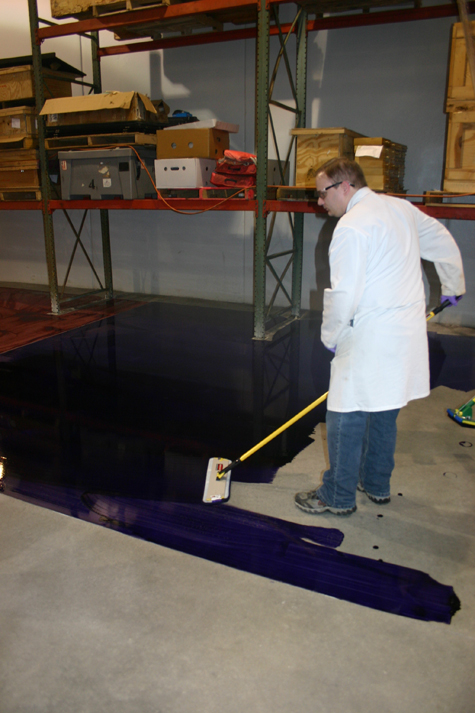
Chris Moore, PROSOCO's research and development chemist, uses a micro-fiber applicator to color a freshly ground concrete floor with a water-based stain. PROSOCO photo

    Hardening/densifying
    You increase the efficiency of the polishing by hardening/densifying the floor at the point where you finish grinding and begin polishing – typically where you switch to resin bonds from metal, but after that first color application if you’re using color.

    Harder, denser surfaces polish faster and easier because of the increased surface area and decreased porosity. But they also make it harder for the color stains to penetrate, so harden/densify after the color goes down.

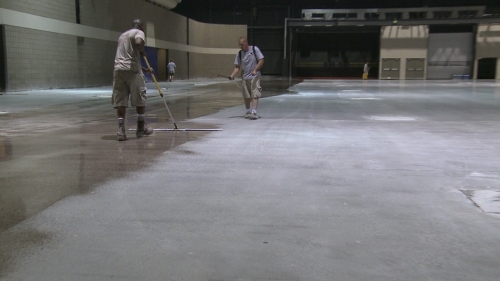
    Workers at Bartle Hall Convention Center, Kansas City, Mo., use a lithium-silicate hardener/densifier (Consolideck LS, made by PROSOCO, natch!) to prep the newly ground floor before polishing. John Young photo

    Older sodium- and potassium-silicate hardener/densifiers require scrubbing in, flushing, and wastewater collection. Newer lithium-silicate hardener/densifiers can just be sprayed on with a pump-up or automatic sprayer, and then spread out with a mop, brush or pad.

    Another benefit of hardened/densified floors is that they don’t generate chalky concrete dust. That makes them an ideal treatment for warehouse floors, polished or not.

    Polishing
    You continue with ever finer grits of diamond-impregnated resin pads until you get the level of shine you want. Real gloss starts showing around an 800 grit finish, but higher finishes, 1500 to 3000 grit can impart an almost mirror-like shine. If you want deeper color, put down another coat before the final polishing pass.

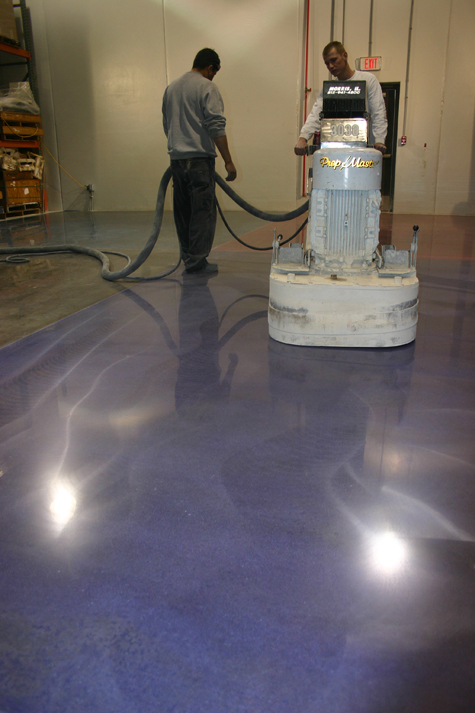
    Polishing begins after the color is applied, and continues until you get the finish you're after. Notice how the polishing has lightened the color from when it was first applied. PROSOCO photo

    Protecting
    Once you’ve got the finish you want, you must protect the floor – especially if you used color.

    You can use either film-forming or penetrating treatments. At lower grit levels, like 800, some film-formers can give you an extra level of shine, saving you some polishing time and effort.

    Most film-formers need to be replaced or refreshed periodically, since they show wear and traffic patterns. The best are actually burnished in to “meld” with the concrete, so don’t ever need to be stripped and replaced. Simple re-application and burnishing – often, just burnishing alone – is enough to “pop” the shine.

    Burnished-in treatments are the best choice if you colored the floor. Some colors can remobilize and run if they get wet when the floor isn’t protected.

    Your other choice is penetrating protective treatments. These will not add any gloss or change appearance or texture in any way. They penetrate and repel water – some also repel oils – from inside the concrete pores. There are highly penetrative treatments that work even on hardened/densified concrete.

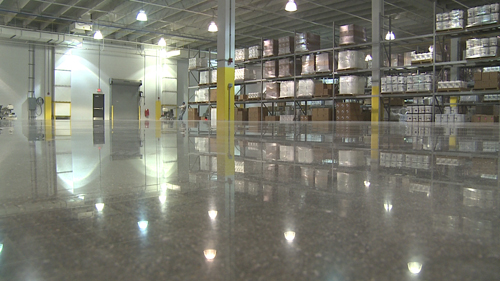
    This warehouse floor, polished to an 800-grit level, is protected with a penetrating water and oil repellent. Because the repellent is a penetrating treatment, it has no effect on the floor's appearance. John Young photo


    Because penetrants work from below the surface, they’re much less subject to abrasion from traffic than film-formers – even burnished-in film formers. They have a lengthy service life, easily measured in years.

    Whether you choose film-forming or penetrating protective treatments depends on the kind of floor and the environment the floor must deal with. A warehouse, with heavy traffic, for instance, would probably take a penetrating treatment, whereas a museum with lighter foot-only could use a film-former.

    Either way, a protective treatment is important, even crucial to the long-term durability of the finish.

    It’s a common myth that finished concrete floors are “no maintenance.” They are low-maintenance, and unlike some flooring types such as carpet and VCT, will last the life of the building.

    Like anything that gets traffic, concrete floors need regular cleaning and attention – just not as much other flooring types.

    But that’s another story.

    Read Full Post »

Cori Sutton drives a 900-pound, 30-inch Husqvarna planetary grinder at the Erie Art Museum. The floor had some work done previously, but Cori and Niagara Machines rep Chris Keyes thought it best to start from scratch. Photo courtesy Diamond Designer Concrete Inc.


When the floor polishing sub-contractor’s sudden, unexpected departure left concrete contractor Tom Maya in a bind, his 27-year-old daughter Cori Sutton decided to jump in, finish the job, and save the day.

There was one slight problem.

Cori knew little about polishing concrete beyond some hand-grinder polishing of concrete countertops.

This job was a 6,500 square-foot expansion of the Erie Art Museum, Erie, Pa. The venerable museum traces its origins to 1898. It’s home to a wide range of fascinating objects from Native American artifacts to modern art, and hosts collections from around the globe.

Maya Brothers Inc., also of Erie, poured all the concrete, but had to look outside the company for polishing expertise. When the polishing sub didn’t work out, Tom said he didn’t know what to do.

“I didn’t think we could get someone new in time,” he recalled. “Then Cori said, ‘let’s do it ourselves’.”

The result — a new company, Diamond Designer Concrete Inc., Cori Sutton, president.

It helped that Niagara Machine Inc., a supplier of top-line concrete grinding and polishing products and equipment was just down the street from the museum. Along with supplying Cori with the gear she needed, Niagara Machines rep Chris Keyes went to the job site and provided the on-the-job training and expertise Cori and her 5-man crew, which included her brother Matt Maya, needed at every step.

It also helped that Cori was a great student.

“Cori jumped in with both feet,” Chris said. “She was attentive, asked questions and did the work. You can’t do something like this unless you’ve got the heart for it. I never doubted for a minute that Cori could handle it.”

“I found the whole process — turning an ordinary gray concrete floor into something beautiful and unique — fascinating,” Cori said. “I didn’t do all the grinding and polishing, though. My brother Matt provided a lot of the muscle.”

This gleaming concrete floor at the Erie Art Museum, Erie, Pa., was created by Cori Sutton, Diamond Designer Concrete, Inc. Cori had no experience with concrete grinding and polishing before tackling this high-profile project. photo by Chris Keyes, Niagara Machines.

Though the previous contractor had done some work, Cori and Chris decided it would be best to simply start over. The process began by flattening, smoothing and exposing the aggregate of the new concrete floors for the “terrazzo look” the client wanted, Cori said.

Chris recommended a 900-pound, 30-inch planetary grinder. Armed with 30-grit metals, the grinder chewed into the floor with all the authority nearly half a ton of weight gives you.

Succeeding grinds with 60- and 120-grit metals smoothed the floor further, followed by ever-finer grinds with 50-, 100- and 200-grit resins.

Cori and crew then prepped the floor for further polishing with Consolideck® LS (lithium-silicate) Hardener/Densifier. Along with dustproofing and increased stain- and abrasion-resistance, hardened, densified floors polish faster and easier.

“LS is easy to use, so it was a natural fit, especially for a first-time job,” Chris said. “You just spray it down and spread it out. The learning curve is small and the performance is excellent.”

LS works by penetrating the concrete pores. It fills the tiny voids with tough calcium silicate hydrate, the substance that makes concrete hard to begin with.

With the floor hardened and densified, Cori and crew began polishing. The big grinder whirled the 400-, then 800-grit Prepmaster FL-07 polishing pads over the concrete, bringing up a satin, semi-gloss finish.

“That’s what the museum superintendant said he wanted,” Chris said. “He changed his mind when he saw the increased reflectivity he could get with an application of Consolideck® LSGuard.

The protective treatment takes its name from the fact that it contains lithium-silicate and brings a further hardening-densifying effect to the floor.

After spreading it micro-thin across the polished concrete, Cori and crew burnished LSGuard in with a 3,000 rpm propane burnisher. Friction melds the treatment into the floor, so it never delaminates or needs stripping.

Simple re-application and burnishing – often, just burnishing alone – is enough to re-pop the shine.

At the Erie Art Museum, the LSGuard application increased the floor’s luster by several orders of magnitude without the extra time and expense of further polishing. The durable, but ultra-thin coating also gave the floor added protection against spills and abrasion.

The floors actually became another piece of art for the museum, Chris said.

Visitors and artwork alike reflect on the Museum's polished concrete floors in the Bacon Gallery--the space that connects the Old Customs House Building with the new construction. photo courtesy Erie Art Museum

They also helped the museum capture a 2010 GreenSite Project of the year award for sustainable building practices. The award cited the polished floor for “enhancing the project’s sustainable platform” by “eliminating carpet and mastic floor covering, eliminating the slab saw-cutting process, and using all local materials and products.”

The GreenSite Award Project is a joint venture of Concrete Construction and Concrete Producer magazines.

Next up for Diamond Designer Concrete is a 6,000 square-foot area in a manufacturing plant not far from Erie. They want to replace the old epoxy floor with polished concrete, Cori said.

To help get the job, Cori took her prospective clients to see her work at the Erie Art Museum. In addition to seeing the beauty of the polished concrete floors, the group heard from the museum’s head of maintenance. “He said he loves the floors because they’re so easy to care for,” Cori reported.

The happy ending – and beginning – come as no surprise to Cori’s father.

“As employees in Maya Brothers, Cori and Matt made my company bloom,” he said. “Matt’s still more of a flatwork guy, but Cori loves decorative.

“Speaking as a businessman and not as a father, I’d hire Diamond Designer Concrete any time,” Tom said. “From what I’ve seen, Cori is definitely on the right road to becoming a high-end contractor.

“Heck, if my business gets slow, I might even come out and push a grinder for her myself.”
# # #

A visitor views the Erie Art Museum’s “Hidden in Plain Sight” exhibit in the newly expanded gallery space. photo courtesy Erie Art Museum

Read Full Post »